Saturday, August 29, 2009

One Night in mon Paris..

Quebec City - A city for lovers
Something most will not know about me, or will have forgotten, is that I lived in Old Quebec City for almost 6 months shortly after graduation. It is an absolutely beautiful city, and when I arrived back there yesterday for a work event, I decided my trip would not be complete without a drive around my old stomping ground.

What I always felt was the most romantic city in our country has not changed. Even in weather that resembled November 29 more than August, couples hurried along the cobblestones, umbrellas in hand, admiring the 400 year old beauty by night.

Sadly, what was also equally as true, is Quebec City is still a very lonely city when you're by yourself. I drove up and down the one-way streets in La Vielle Quebec, reliving my summer spent wandering the city on beautiful, warm weekend mornings.

The feeling that crept into my stomach was one I knew very well while I lived here. All this beauty and culture, and all I wanted to do was share it with someone. It just seemed like such a pity to enjoy all on one's own. When I look back on living in the city, it's the one reason my whole experience was not as memorable as I would have liked. Perhaps, I had the wrong attitude about the city altogether, but it is definitely the culture that draws people to this city. Its the breathtaking moments of the sun reflecting off the old wall or the calm of the St. Lawrence at dawn. Photos could never do the city justice.

The old city is fueled primarily by tourism and arts, and from a city-living standpoint, I never saw the convenient amenities that attract urban-dwellers to other large Canadian cities. There is a bus system, but I never had the opportunity to take advantage of it to get to the shopping centers in the suburbs, parking is sparse, and the market stores, where I pick up fresh bread and fruit in Toronto, also just don't exist.

All is not lost though, because even a lone traveller needs to eat. The city has some phenomenal restaurants and lovely patios. Take a suggestion from Meetings Canada, and check out some of their recommendations. My personal favorite? Le Cochon Dingue.
Sunday, August 23, 2009

The Roof Situation To Date

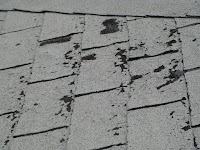
Old, worn out shingles on my roofA week ago, I shared my ceiling damage due to my leaking roof. Over the past few days, my roof has taken over my life trying to locate and halt the leak and determine a solution.

Thursday's massive storms that brought tornados to Southern Ontario also hit my region with a torrential downpour and severe thunderstorm. This confirmed the leak was not a one-time fluke, but a major problem to be dealt with as soon as possible. With the storm raging outside, I thought I could do nothing but place a bucket and towel beneath the ceiling and watch it slowly deteriorate. Then, I realized finding the leak would be much easier when it was actually leaking, so I grabbed my step-ladder and ventured up into my attic.


I'm not claustrophobic, but to say I'm comfortable in a tiny attic would be a stretch. Luckily, I didn't have to look long and with my flashlight and head up in the attic, the leaks quickly became visible. Yes, that is right - LEAKS, as in plural, with an "s", multiple.


Clearly, my south roof is done. The water is going right through the shingles, through the plywood and into my house.


So, now I have two options.


I can hire a roofing company to replace it. I called one Friday, and when he came to look at it, he fixed the really bad holes (bonus!) free of charge. He (and I) thought this would buy some time until I could fix it. Turns out it's even worse and with yesterday morning's rain, it leaked yet again. He left me a quote for $4200 (after tax) for the whole roof. I'm going to get another on Monday to compare against.


My other (possible) option is to coax my dad and brothers to help me replace the roof. Okay, I'll be honest, they will probably do most of the work. I promised to help as much as I could, even if it just means feeding them, buying beer and loading up the old shingles for the dump.


Wet Dry Roof Repair product I used to temporarily fix my leaking roof


I gathered some material quotes today while at Home Depot buying stuff to temporarily patch the leaks. So far, my costs are around $2000 for shingles, new plywood, tar paper and eave protector. Home Depot has this handy worksheet to help calculate costs also. It is suggesting a cost of $2800-3400. The only significant cost I haven't considered is disposal of the old shingles. Whether I rent a dumpster, or use the back of a truck and take them myself, there is still going to be a disposal fee.


So the budget for this.. is not really existent! How frustrating it is since I was finally starting to feel like I had some control! I will be spending the next couple of days figuring out the dollars and cents, then will need everything lined up to start at the end of the week! Look for an update next week, hopefully with a new roof!

Wednesday, August 19, 2009

Savvy Homegirl Has Gone Stainless!

It's almost embarrassing to admit, but I had a fear of stainless cookware! For the longest time, well the last six years I lived on my own anyway, I have sworn by non-stick. Haunted by unpleasant experiences of scraping dinner off poor-qualify pans in college, I was sure nonstick was the surefire way to great cooking. Until tonight!

After six months with a stainless skillet in its box, in my closet, I pulled it out last week. "It's time," I thought. "I need to learn how to use this if I'm ever going to call myself a cook." Finally tonight, I ventured to put it to the test with a casbah chicken and rice recipe.

First, I heeded some very critical cooking advice I recently received from a fellow Pampered Chef consultant. I didn't turn the burner on high. Instead, I heated the skillet up on medium-high heat, added oil, waited a minute or two until it was hot, then added my chicken.

It worked fabulous! My chicken was cooked in five minutes, and it didn't stick to the pan! I was so impressed! I threw my veggies in and they cooked within minutes and when I left the skillet on the burner to go check the BBQ, I came back to my meal the way I left it. I would've been scraping bits of onion, chicken and sauce off of the bottom of my old frying pan.

I don't know how this skillet compares to other stainless on the market. Mine is the 10 inch Covered Skillet from The Pampered Chef. I earned it as part of a sales incentive in January, and I was sure I would give it away as a wedding gift, but when I realized it was worth $160, I decided it may be worth keeping after all. Looking for a good skillet of your own? The Pampered Chef has cookware on sale this month for 60% off! To learn more, check out "For My August Hosts" on my Pampered Chef Website.

Wednesday, August 12, 2009

My Roof Is Leaking !!!!

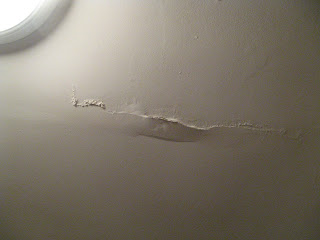
Soggy drywall on my cieling
It is true. If you say something often enough, it will come to be. My friend jokes with her family about supporting my Pampered Chef business to keep my roof from leaking. You probably can guess where this is going! After a weekend of heavy rain and wicked storms throughout Southern Ontario, my roof is leaking!

I returned last night after another wedding away, to discover this saggy, split drywall in my office ceiling. Not exactly what I was hoping to discover. Especially after I realized last night my basement had also sprung several new leaks. At least, I could pinpoint their cause. It rained so much this weekend, my eves can't get the water away fast enough. Not to mention, my rain barrel is overflowing, and the water is probably running down along the foundation.
You will recall I fixed my leaky basement once already by regrading the backyard. Time for some more landscape and evestrough work!

Wet basement againThis puddle is definately a new leak in my basement


But, my roof! It would be one thing if it was a dripping leak, because at least the pressure would be released. Instead, its soaked into the ceiling drywall. Okay, an actual dripping ceiling would not be cool either. Regardless though, where is this coming from?! My shingles are starting to age, but they didn't appear to be in that bad of shape. I'll have to climb up and take a look. In the meantime, I'm praying the rain stops!
Since writing this, I discovered my futon is soaked and there is a puddle beneathe it on the floor. Turns out this must have been a full-on leak afterall. It's definately not any better... shoot.


Monday, August 10, 2009

An Update on my Jar-Budget Method

I've now been doing the jars for over a month, so I thought it was only fair to update my progress.

In my opinion, I have not done well. Even if I'm extra hard on myself, I know there is room for improvement. I can point to one main reason for this shortcoming thus far - the money needs to go in the jar! It sounds so simple, it's silly!

Seriously, if I do not actually put the cash in the jar, then I find myself saving receipts to keep track of where I'm at. It just doesn't work! The week is over before I know it, I tally the receipts up and I'm over, I've spent the money, and I can't remember what my original budget was. Now, I think I understand why this budget method really works, because even if you think you know your finances, it is a surefire plan.

Why is this so challenging? Beyond a doubt, it's because it requires such a change of habit. I have been accustomed to using plastic (debit and credit) for so long, physically going to the bank for cash is difficult. It takes time! It takes time to plan my needs at the start of the week and time to get the cash. I can't 'carry over' on my credit card until the next pay cheque either as I have foolishly told myself in the past. I have to confess though, I did resort to my credit card for a few 'extraneous' expenses last month. My passport renewal, for example, was one expense I overlooked and could not longer delay.

So, today is Monday and its a new week. I put gas in my car on the weekend, so my only expenses for the week were 'going out' and groceries. The groceries were picked up tonight, and I plan to go to a movie tomorrow night (Julia & Julia looks SO cute!) That will pretty well empty the jars, so I'll be keeping a low profile out on my work trip later this week. Hopefully, I'll be able to give a full report come the end of the month, complete with some numbers!

Tuesday, August 4, 2009

Help My Eyesore Basement Win a $15,000 IKEA Makeover

My Eyesore Basement RenoAs if the 2010 Catalogue was not reason enough to celebrate, IKEA is giving this Savvy Homegirl even more to be excited about- $15,000 worth to be exact!

The IKEA "Any Space Can Be Beautiful" contest is just what my basement has been yearning for! All I could think about during last weekend's Bridal Shower was how convenient it would've been to have a finished basement for all the sleeping bodies sprawled throughout my home!

I wasted no time snapping some photos and getting my entry submitted. Now, "Jen's Eyesore Basement Reno" needs some votes. This is where you come in! Check out my basement and vote!
(Just in case the link doesn't work - here it is) http://www.anyspacecanbebeautiful.ca/index.php?spaceID=1525

In fact, bookmark it to come back daily, because you can vote every day! Think you have your own space desperately needing an IKEA facelift? You'll find a link to submit your own entry also!

Another bonus? Throughout the contest, IKEA Designers Janette Ewen, Karen Sealy and Karen Kayne will be commenting and providing design advice to lucky homeowners, who will then win a weekly prize!


Sunday, August 2, 2009

My First Attempt at Cake Pops

WARNING - Final photo may be inappropriate for children or those without a sense of humour!

The Bachelorette with her cake popI did it! I managed to find enough time to try my own cake pops.. er, should I say 'boobie balls' as my bachelorette coined them!

Yes, it may be a little inappropriate or just downright silly, but when planning my first venture into cake pops, it was suggested I try making 'boobs'. Afterall, it would save me some time shaping the pops. Not to mention, be extra entertaining for my friend's bachelorette party!


Recently, I've been checking out some baking blogs, and I love Bakerella's cute little cake pops. I followed her instructions here. I also snapped a few pics along the way to show you how it went!

Being a bit of a Betty from time to time, I opted Finished chocolate cake in Pampered Chef Stonewareto bake my own chocolate cake rather than use a box. A little ironic, I was too lazy to go buy boxed mix when I had everything to make a homemade cake in my pantry already. I found a recipe in one of my IPM (International Plowing Match - like a country fair that moves from county to county each year) cookbook for "Our Favourite Chocolate Cake". It was so moist and worked really well for the cake pops.


Our Favourite Chocolate Cake - From Greenwood Court, Stratford, Ontario

2 C flour
2 C sugar
1 tsp salt
1 tsp baking powder
2 tsp baking soda
3/4 C cocoa
1 C salad oil (I used canola because I like it better than olive oil in my baking)
2 eggs
1 C hot coffee

Instructions: Mix the dry ingredients together and then add the liquid ingredients in the order of oil, milk, eggs, adding coffee last. Batter will be thin. Grease two 9" pans or a 9"x13" pan and place in preheated oven at 350 degrees for 35-40 minutes.

My favourite part of making these was definately ripping the cake up and mixing it together with the icing! Mmmm... It doesn't seem like you're eating a whole piece of cake when you're eating spoonfuls from a bowl! I used the same icing recipe that Bakerella suggests. Notice my ANCIENT mixer. This was a wedding gift my mom recieved 29 years ago! She passed it along to me when I gave her a much-needed new one last Christmas. The speeds only work intermittantly, but it still does the job!


Cream Cheese Buttercream Frosting


Chocolate Cake ripped up to mix with icing


After rolling into balls and cooling in the fridge, the cake was ready to be dipped in pink chocolate! I bought white and pink chocolate merkins, or candy wafers, from the Bulk Barn. After melting the white wafers on medium heat in the microwave (stir often to avoid burning), I added some pink and heated again to give the chocolate a pink tinge.


Boobie balls all done
Here the finished cake pops, decorated with a little extra icing and butterscotch chips. They were a hit, and half the girls took home extras for their husbands and fiancés!